Part 1
Space Turtle Chomp
We will start off today creating a simple Python game using Python Turtle Graphics. Turtle Graphics is a prebuilt set of python instructions that allow you to create and move characters around the screen allowing you to draw pictures, logos and create simple animations or games.
Step 1. If not already open please open VS Code.
Step 2. Select File –> New File you should see your program window
Step 3. As it is a great idea to save your project at the beginning of any new development, select File –> Save and name the file (I called mine kbgame1.py)
VS Code may ask if you want to install a Python extension, feel free to follow the prompts and do so.
Step 4. When coding one of the first things we should always do as a developer is leave a comment explaining what the program does at the top of the screen. We can make a comment using #
An example of a comment is below, try writing the below on the top line. This code won’t run, so feel free to write whatever helpful notes you like here:
# Turtle Graphics Game – Space Turtle Chomp
Step 5. Next we need to import the Turtle libraries and set up the screen, we do this by typing:
import turtle

# Set up screen
turtle.setup(650,650)
wn = turtle.Screen()
wn.bgcolor('navy')
turtle.setup sets the size of the Turtle game window (it’s not necessary
but helps when using different screen sizes).
wn is the name we are calling the screen (as we learnt in the Python
introduction all variables need a name). bgcolor allows us to set the
background colour. There are lots of colours to choose from.
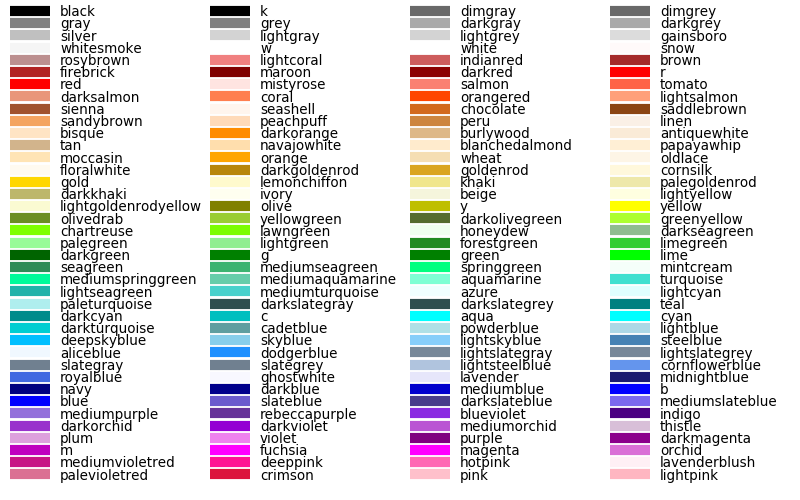
note the American spelling of color, this is something to watch out for when programming.
It is good practice to leave a comment (#) before your code so you can remember what it does
Step 6. Next we create our first Turtle character, we do this by typing:
# Create player turtle
player = turtle.Turtle()
player.color('darkorange')
player.shape('turtle')
player.penup()
So we create a new turtle variable called player then use the inbuilt turtle
attributes to help set it up, player.color (again we can select a different
colour from the colour chart). player.shape selects the shape (you can also
use circle, arrow, square and classic). penup means that the turtle shape
won’t leave a line went it moves (think of a pen in your hand, penup()
you don’t draw, pendown() you do draw).
Step 7. Now we set the speed we want our turtle to move across the screen at:
# Set speed variable
speed = 1
Step 8: Finally we need the turtle to move and the easiest way to do this is by setting a while loop:
while True:
    player.forward(speed)
Note the indent of the line starting with player.forward. This indent needs to be there for the code to work.
This piece of code is slightly different to the code you have written
before. Instead of telling the computer to perform an instruction once you
are telling the computer to repeatedly perform that instruction for as long as some condition
is true. You are doing this using what’s called a while loop. The syntax of
a while loop is:
while <condition>
   # do stuff here
In our example <condition> is simply the value True, that always evaluates
to True. Meaning that our turtle will move forward until the program is
closed.
Step 9: Now all we need to do is save our code, we can do this by selecting File –> Save (Ctrl S on Windows or Cmd S on Mac). Then run the module by selecting Run –> Run Without Debugging (or pressing Ctrl F5 on Windows or ^F5 on Mac )
You should see two windows open up a Python Shell window that will have “Python 3.6.1 (v3.6.1:69c0db5, Mar 21 2017, 17:54:52) [MSC v.1900 32 bit (Intel)]…” or something similar written on it and your Turtle window with a Navy background and Dark Orange turtle moving across the screen. Close both the shell and turtle window to return to your programming code.
Before moving onto the next section you can have a play with your code by
trying different colours, shapes and speeds and for some fun you could change
player.penup() to player.pendown()
Your code should now look like this: kbgame1.py
Congratulations Module 1 Completed